![[Lowvolt ICON]](lowvolt_ico.gif)
 |
| Low voltage indicator circuit. |
D1 is a green led, D2 is a red flasher led, T1, T2 and T3 are low voltage
NPN signal transistors. A BC547B would do. Add 100 Ohm resistors in the
emitter line of the transistors if both leds simultaneously glow at around
12.5V The circuit draws approx. 15mA.
![]()
This circuit converts MIDI to a TTL signal that can be fed directly
into a UART. Please note that a PC/AT serial port cannot accommodate for
the given baud rate.
 |
| Midi to TTL conversion. |
| Input voltage | 9V ~ 15V |
| Output voltage | 12V ~ 25V |
| Output current | Max. 3A @18V |
| Switching frequency | 20kHz - 40kHz |
| Efficiency | 65% - 95% |
If you know these circuits, please skip the following. The circuit is a step-up converter, and it's workings can be explained by the main property of a coil: its inductance. Imagine a current flowing through a coil. The inductance will cause the current to continue running, even if the power supply that caused this current is taken away. The voltage across the coil will take any value required to keep the current running. This is why you can easily create sparks with a coil, a spark is simply a current flowing at a very high voltage.
This circuit flips between two states: 'charging' the coil with current,
and dumping this current into the output capacitor. The frequency at which
this happens is so high that only a small ripple remains at the output
capacitor (10000uF). Here is the circuit.
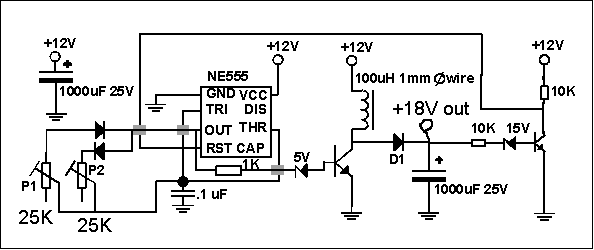 |
| Low cost step-up power supply. |
The 555, a timer circuit, generates pulses of specific width that control T1. T1 either grounds the coil, allowing current to build-up, or disconnects it, allowing current to flow through D1 into the buffer capacitor. The combination of R1 (10K) and the zener of 15V plus T2 is actually a simple voltage monitor. When the output voltage is higher than approx. 16.5V the output signal will drop low. As this signal is fed to the 555 RESET input, no pulses will be generated if the output voltage is above approx. 16.5V using a 15V zener. The 5V zener is necessary for proper startup of the circuit at powerup.
Use a coil with 1 mm wire diameter, inductance approx. 200uH. T1 is a power darlington. A TIP141 works fine. A MOSFET would be better, use rdsON < 0.1 Ohm. T2 is an ordinary signal NPN, eg. BC547B. Use a power scottky diode (D1) for highest efficiency, but an ordinary silicon type will do. Take care: at 18V @3A quite a bit of power will be dissipated in the rectifier. Cool it. If you have the choice, use "low ESR" type of capacitors.
So, what are the adjustable resistors for ? Well, although this principle works for whatever frequency, some frequencies do better. This is due to the fact that some power is lost by flipping states, some is lost by ohmic dissipation in the coil and more. All these mechanisms together case this converter to posses an 'optimal working point'. With this circuit, the point is characterized by two period lengths: charge_time and dump_time. These can be set independently by P1 and P2 respectively. At this optimum, power is converted at maximum efficiency (up to 95%).
"Now, this is the catch", you may think, and you are right. It is not easy to trim this circuit to its optimum. Try the middle settings of the pots first. This should be a good starting point.
P1 determines charge_time, P2 dump_time. This shouldn't be taken too
long, as the coil will quickly 'saturate' causing a very large current
to flow. Now slowly decrease both pots until the output current reaches
its desired value. This is only step one. Step two involves finding an
acceptable optimum. Keep adjusting the pots until you get the least input
power while still maintaining the desired output voltage. I get an efficiency
of approx. 75% at 30W using a schottky barrier rectifier.
Be careful not to overheat T1 or D1, check their temperature regularly
while adjusting.![]()
The signal transmitted by a remote control usually consists of serialized
binary data, which is modulated at about 38KHz. The receiving device converts
the modulated infrared light into electrical impulses, demodulates and
processes them to obtain digital codes corresponding to the data being
sent by the remote control. With the following diagram, I assume the "stop"
key is pressed on the remote.
![[IR sender to receiver diagram]](irblock1.gif) |
| Fig. 1.1. Functional diagram of an infrared link. |
I would suggest the following configuration, in which the modulated
signal is converted back into the electrical domain, transmitted along
the phone line, and converted into the IR domain at the receiving end.
![[IR trough phoneline diagram]](irblock2.gif) |
| Fig. 1.2. IR to phoneline and back. |
This approach has the following advantages:
![[IR to electrical circuitry]](irphsend.gif) |
| Fig. 1.3. Infrared to phoneline circuit. |
Here's the circuit I used to convert from phoneline to IR. Note that
always one IR sender diode gets biased from the phoneline, regardless of
its polarity.
![[Electrical to IR]](irphrcv.gif) |
| Fig. 1.4. Phone line to Infrared circuit. |
The idea is to point your remote to the IR receiver transistor in fig. 1.3, and point the IR transmitter led of fig. 1.4 to the IR receiver module of the device you want to control. I use a spacing of approx. 1 cm, increasing this spacing will lower both interference levels and sensitivity.